Archive for the ‘Quilt: The Graduation Quilt (aka The Cougar Quilt #2)’ Category

The Graduation Quilt Update

Wednesday, August 19th, 2009
Last week I almost finished piecing the top – I just need to add the BYU and a little surprise.
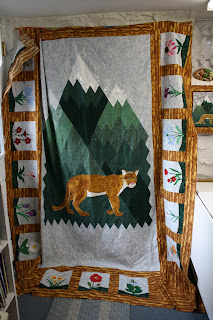
And of course……………….
this quilt HAD to have a “FUN BACK”.

I used all the pieces leftover – even all the diamonds!
It was great cleaning up after this project because I didn’t have a bunch of smaller pieces of fabric …………….. yah for FUN BACKS!!!!!!

What were you doing six years agao?

Wednesday, August 12th, 2009

Six years ago Tom was at Scout Camp and I was working on finishing the Cougar Quilt for Jennie to take to college.

What am I doing this week – the same thing. Tom is at Scout Camp and I am working on the Cougar Quilt #2 – except Jennie has graduated and it is a really belated graduation present. If you are wondering why I am making the exact same quilt again……read all about it here (Scroll down to read the part about the Cougar quilt). . The flowers are all appliqued and just wanting to be pieced into the top. What to see the flowers – check here.
Last night I put the cougar together. I had started another cougar but the fabric was not quite right, so I finally decided to just bit the bullet and redo the cougar. I am so much happier with it now. In fact, I think that incorrect fabric choice is what has been holding me back. By finally deciding to just start over I am much happier with the cougar and excited to work on this project.

Here is a close-up of the cougar. Now to do the thread work on him and then applique to the mountain background. That is tonight’s project.

A little sewing last week!

Wednesday, April 22nd, 2009

When I was packing for my trip to Utah I did a much better job packing the things I would need for a couple of project that I wanted to work on than I did for clothing. Needless to say, my family out there probably got sick of seeing the same clothes all week long.

I debated about taking my thread box, but I decided to and it was a good thing I did.


I completed the applique on the flower blocks for the Graduation Quilt (AKA Cougar Quilt #2). You can read about why I am remaking this quilt here.

Here are the blocks that I did the thread work on when I was not playing Grandma!

Projects for this past week

Monday, February 11th, 2008
Gift Bag Swap Challenge –
sewed the orange borders back on, prepared the beehive, and worked on the flowers for the appliqued borders.
Now I am trying to decide if I want the flowers on just two corners opposite each other, or should I do the applied flowers all around the outside of the quilt. What do you think?

This is my NOYB project. Above is the quilt I made for Jennie (2003) when she wnet to Brigham Young University. When she got married things good pretty crazy with the moving and everything else and some of her things were never to be seen again. This quilt was one of the things that went missing. So I (with Emily’s suggestion and encouragement) decided to remake this quilt for Jennie for her graduation. I wasn’t really good with my timing – she graduated in December and I am still working on the quilt. Even with just pieces in the box, Jennie was pretty touched when she opened the present at her graduation party.

I encountered some problems when working on the mountains but, finally finshed piecing them this week. I have some of the flower blocks appliqued. I will try and do a couple of them this coming week.

This is another one of my UFOs. All these stars are from an international swap I particiapted in a few years ago. This week I have been embroidering the name of the maker and where they are from. The quilt’s name will be called “Stars from All-over” or I just had a thought, maybe I should call it “Quilting Stars from All-over”. Have to give that some thought. Might be a fun play on words – the star comes from all over and also the person (Quilter) is a star and they are from all over.


And I sewed 13 wheelchair bags this week.

The Seven Year Itch

Monday, November 26th, 2007
Nativity Advent Wallhanging
constructed by Mary Anne Ciccotelli
Pelham, New York
November 2000 – November 2007

This project was started November 2000 in Ames, Iowa. My daughter Emily and I went to visit Iowa State University during her senior year to see the campus and check out the programs the school offered. Her boyfriend (at the time) was attending Iowa State, so needless to say, I had a lot of time to fill by myself. Luckily, there was a JoAnn’s fabric store in Ames. I found a book with the pattern for this advent calendar in it. I love to collect nativity scenes so I decided this was the perfect project. I also decided that I should make three – one for me and one for each of my daughters. I purchased little bits of fabric and other needed supplies and started working on the nativity figures that weekend in Iowa.

Each Christmas season, I would pull this project out and do a little more work on it. This past September, as I was preparing for my visit to Idaho, Emily suggested that I bring these wallhangings to Idaho and work on them. I did not quite get them completed while in Idaho, but I did continue to work on them. At last, these projects are off my UFO list.
(From the pattern – Glad Tidings Advent by Art to Heart)

There are 23 figures and the wallhanging. I am thinking put can put the wallhanging up Dec. 1 and then move a figure to the manger scene each day up until Christmas. I only did 24 things because then you can complete the scene on Dec. 24 when you still have time to enjoy it. Because when Christmas comes everyone is usually so busy with the gifts to put the last item on the scene.


Here is a picture of one of the labels.
All the figures our in the Manager scene.


I love the sheep.

This is one of my favorite figues. I love how I used ends of toothpicks for the drumsticks.

You would think that I since I just finished three projects off my UFO (UnFinished Objects) list, that I wouldn’t want to start anything new. Sorry to say, that is not quite how it works, so here is a picture of one of my newest projects. I wanted something easy to display the folded hexagon oraments when I am out doing the hands-on-demo, so I thought of putting them in a wallhanging with a Christmas tree. Here is the beginning of the project, I will probably not do much more on it until late February because my next demo is scheduled for sometime in March.
I thought is would be fun for the Christmas tree to be 3-dimensional also.

Here is one folded hexagon I have made for it, now to make some more to make the tree look even better. And maybe even some working lights? Have to wait and see how things all work out.


This is another project that I am working on,
but…………………. NOYB!!!!
(None Of Your Business)